
Hello Beach Dwellers
I have to tell you that for several reasons this Beach House decor project scared me a lot. But actually, once I felt the fear and did it anyway, I can't tell you how happy it made me. I was so buoyed by it, I gave my kids what they wanted for dinner, danced around the house to their squeals of joy, inspired by my good mood and was even kind to Mr Beach House, which is not always on the menu round here. I was worried about the solvents in the glue melting the rice paper of the original shade covering, of cutting straight and mucking up some of the prettiest fabric I have seen in ages, but it got to the stage where I needed content for the blog after mucking up another project, which you will know about if you follow in instagram and I just had to jump in.

I intend to make two of these to sit at either end of the sofa in the media room, but wanted to see if I could put this together before I spent money on a matching lamp shade. This lamp shade was surplus to issue, after installing what I am calling my Moroccan chandelier over the dining room table. I had the lamp stands from Laura Ashley, when this kind of thing was all the go in the 1990's. I've been that close to chucking them that many times, but actually I think the darker wood fits nicely with blue and white fabric.
It was so easy in the end and I am so proud of how it turned out. If you don't look too closely, you'd think I paid top dollar in a designer store.

So here's what you will need for this project. I only ended up using the adhesive spray. I thought I'd need the PVA for the join, but didn't bother, as the spray worked perfectly well without any mess.

So I bought a metre of fabric and folded it over, ironing the seam to ensure I cut it straight.

I also ironed the end seem so I would get a nice finish at the back of the shade. I measured it in three places across the seam, to ensure I ironed a straight line. My seam was 3cm/1inch.

I cut the overhang where the wire stays were, so it was easy to stick it down on the inside. I did this on the other side too even though there were no stays, as it just made it easier to manoeuvre the fabric into place inside the lamp shade. Before you start with the glue make sure you decide which way is up with your lamp shade and which way up you want your fabric to sit.

It's important to get the right tension on the fabric so it doesn't buckle and look bumpy. The glue was pretty forgiving and stays tacky for a while so I pulled it off once, to ensure all areas were smooth. That bit worked remarkably easily.

You will also need to trim up your overlapping hem to about 1 inch or less. My overlapping bits were longer as you can see and when I turn the light on, you can see where the hem is. That doesn't bother me so I left it, but I did wonder what it was when I first turned the switch. This may not happen on thicker lampshades, but because mine was made of rice paper, it left a distinct line with the globe shinning behind it.
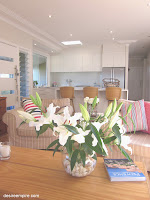
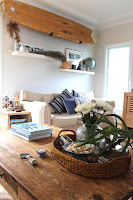
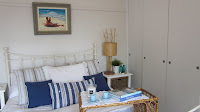
Once she was done, I styled it up with a faux pineapple and some lovely thrifted Hardy's silver. I mean how can people throw this stuff out I wonder. I added some coral for a little coastal pop.

Along with $5 thrifted bamboo mirror, we have a coastal Hamptons, tropical, coastal thingy in motion and I for one love it and can't wait to complete the lampshade for the other end of the room. It's not perfect, but it cost me very little and has certainly lifted the room in a big way and that's what we are all about here on this little blog people. Looking good on a budget. I've lived by that rule all my life and today it's working for me.
Have a beaut weekend

Today I am linked up here
Feathered Nest Friday
Inspiration Friday
Home Sweet Home
Flaunt it Friday
Show and Tell Friday
Saturday Style
Weekend Wrap Up
Sundae Scoop
Sunday Showcase
Market Yourself Monday
Metamorphosis Monday
Table Top Tuesday
Take a Look Tuesday
Talent Show Tuesday
Wow Us Wednesday
DIY By Design
No Minimalist Here
52 Mantels
Transformation Thursday
House of Hepworths
Shine on Fridays
Craftomaniac
Home Maker on a Dime
Simply Designing
Whatever Goes Wednesday
Vintage Inspiration
Saturday Style


Nice job, Carolyn! Very pretty!
ReplyDeleteHave a wonderful weekend!
That fabric is gorgeous, Carolyn. I have been tempted a few times to tackle a lampshade, but never have - maybe with your inspiration I might give it a go. Margaret
ReplyDeleteI love the lamp shade!You made good work. I also love the painting with the boats behind it in one of the photos.AriadnefromGreece!
ReplyDeleteLooks fabulous Carolyn!
ReplyDeleteLove how it all came together!
I have a lamp to do up too- when I get the time and actually decide what I want to do with it!
it looks great, i love the fabric!
ReplyDeletethanks for the tutorial.
x
Nice job. Love the fabric, too. I can't wait to see the whole
ReplyDeleteroom with the other one in it.
Looks great Carolyn. Love the fabric. I totally get how you feel when you've made something for very little money and it looks great.
ReplyDeleteEnjoy x
I really need to do this. Thanks for sharing. You've inspired me.
ReplyDeleteNice fabric Carolyn.
ReplyDeleteAnne xx
That fabric is absolutely gorgeous and you have done a stellar job. Well done, am seriously impressed! x
ReplyDeleteLOVE it! Beautiful fabric!
ReplyDeleteWhat a gorgeous difference, great choice in fabric. I've never tried to recover a lamp shade but with your excellent tutorial think I might be able to wing it. I tend to let projects scare me off instead of just going for it. The colors and pattern on your fabric sure would wake up a room, so bright and clean looking.
ReplyDeleteI'm so glad I found your blog as I love it and am entranced with Australia.
Have a great weekend yourself.
I'm not always too happy with my other half. We're together 24/7 and there are times I'd happily bonk him one. He was a trucker for years so I was alone alot, got used to doing what I wanted, when, so when he bugs me I come into my studio and write comments to wonderful bloggers and get awesome ideas.
Hey sprcrftr
DeleteThanks for your kind words. I've tried to find a blog for you several times so I can see what you're up to, but with no luck. Are you a blogger?
Carolyn
Hi Carolyn,
ReplyDeleteI've never had the guts to do this but now I think I might have a go.
It looks awesome. I love all the other bits next to it too and the thrifted mirror.
Nice room ;O)
Tania xx
The effort to happy factor ratio on this project was an inverse relationship. It was so easy and made me very happy. So glad to have inspired someone.
DeleteCarolyn
great tutorial carolyn, I think I might try this. Your choice in fabric is lovely!
ReplyDeleteBec x
Oh its beautiful Carolyn. Love this fabric, its divine. Love your mirror too, such a find. Can relate to how this lil makeover makes you feel... So rewarding to sit back & enjoy your own creative efforts Rxx
ReplyDeleteLove love love it you clever chick. I have a couple of lampshades I want too make over but I havent been able to commit myself to any fabric yet. I do love your choice of fabric though. It would look gorgeous in your house too. xx
ReplyDeleteIt was providence that I read your post today. I have an ugly shade that needs replacing, but I can't find one that fits on the lamp. I have the fabric so now I just have to buy the spray adhesive.
ReplyDeleteYours is beautiful.
Not singin' any blues over this fab blue/white lampshade! Looks stellar!
ReplyDeletexo
Cathy
Great job, looks gorgeous - you beat me to it. Just had mine made into curtains. Can't wait to get them up.
ReplyDeleteBeautiful makeover. I love all of your coastal accents. You have a lovely home.
ReplyDeleteBeautiful, love that fabric! Saw your link at Met Monday, thanks for sharing with us!
ReplyDeleteGorgeous fabric, the shade looks amazing. Thanks for joining TTT. Hugs, Marty
ReplyDeleteThat turned out really good, I have a lamp that needs to be redone and this has inspired me to do it.
ReplyDeleteI love the blue and white! The fabric is gorgeous. Nicely done. Thank you for sharing. Would love it if you would share this at my Make it Pretty Monday party at The Dedicated House. http://thededicatedhouse.blogspot.com/2012/10/make-it-pretty-monday-week-20.html Hope to see you at the bash! Toodles, Kathryn @TheDedicatedHouse
ReplyDeleteWow that really looks great. I have been wanting to cover a lampshade we have. I just have to find the perfect fabric. Thanks for sharing at DIYbyDesign.
ReplyDeleteBeautiful...and so nice to find another Aussie blogger :)
ReplyDeleteSo lovely! Saw you linked up on some blog hops. Would love it if you linked up on my blog hop and added it to your list www.w-t-fab.com/search/label/bloghop. Also let me know if you'd like to follow each other!
ReplyDeleteLove this look - great idea. Joining from Shine on Fridays - http://allthoseartsygirls.blogspot.com/
ReplyDeleteThis looks so good! Thanks so much for showing us how to do it..... :)
ReplyDeletehugs X
Crystelle
That fabric is just gorgeous, and you did a super job with your lampshade--I love it!
ReplyDeleteIt's fabulous Carolyn and I couldn't love the fabric more! Jo xx
ReplyDeleteLooks like from all the comments you got this is a very popular project. Inspired several people, myself included.
ReplyDeleteThe fabric you chose is quite lovely, the blue and white with pattern is quite striking in the room. I'm really loving how it looks. You did great job covering the shades. Did you think that shape made it easier? Seemed like that shape would be easier to cover. Glad you shared this project even tho I didn't find it til now. Happy week Pinning
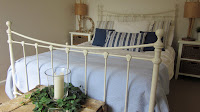
Sadly the days of lots of comments seems to be over. Yes I think the straight up and down shape is definitely easier. I have done two of these and they are now in my bedroom here http://www.desireempire.com/2014/02/how-to-makeover-coastal-bedroom-in-blue.html
DeleteCarolyn